FFF Screening Guide
Introduction
This is a basic guide on how to setup an Outdoor Screening for 100 – 1000+ people using the Free Film Festival Equipment. It can also be used as a base for indoor screenings.
Although this is aimed at the main projectionist for an event, all volunteers helping to put up the screen should read this as it is a requirement for the insurance that qualified or trained personnel handle the equipment.
First a clarification on Insurance and FFF equipment which must be carefully and fully understood.
Insurance
Free Film Festivals has Public Liability Insurance of up to £10 million pounds which covers any injuries from accidents from using the FFF equipment. It covers the FFF staff and the general public.
FFF equipment is also covered for accidental damage and storage at the lockup and people’s homes. It does not cover equipment left in a car or in a van so if you choose to do this you will need to cover replacement if it is stolen.
The insurance does not cover personal equipment e.g. mobile phones and laptops and FFF will not cover this from its funds. So, if your mobile phone or laptop gets damaged by plugging into FFF equipment you will be liable to replace this yourself and replace any damaged FFF equipment as a consequence. Furthermore and more seriously, if you plug in non-FFF equipment and someone suffers an accident because of this the insurance will not cover this and you will be liable. For example if you plug in your laptop into the mixer, the laptop develops a fault which causes the mixer casing to become electrified, someone touches it and gets an electric shock, you would be liable for everything which could include a personal injury lawsuit. It could also be that someone accidentally trips on the cable between the laptop and the mixer causing the table with all the equipment to fall on someone causing injury – this again would not be covered by the Insurance or FFF and the owner of the laptop will be liable.
Therefore, there is a strict ban on using laptops or mobile phones directly plugged in to the FFF equipment. However, it is possible to use Bluetooth to connect a phone or laptop to the digital mixers to play music wirelessly and any content on file can be played using the FFF media player or Bluray players.
Weather
Rain and Wind are major considerations on whether a screening can take place. The new large 16:9 Fast Fold screens are not as resilient as the older screens and so a strict 20MPH wind gust restriction is in place. Furthermore the screen must be reinforced using the provided steel bars and ropes. Light rain is acceptable if the QSC speakers are used with their rain covers on and the fronts open. The Projection table with projector, player and mixer must be covered to protect from rain. Similarly all power cables need to be covered. If rain starts to enter the equipment, the screening should be stopped and electricity turned off.
Power
Power must be supplied either by mains power or generator. An RCD cable reel must be used to connect to the main power outlet for safety reasons. Unwind the reel to the closest speaker position. There is an extension cable in Box A and Box B that should be plugged into the RCD cable reel and this should go to the other speaker.
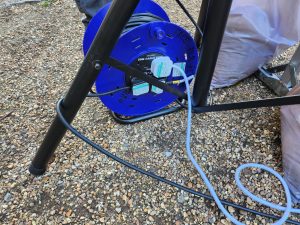
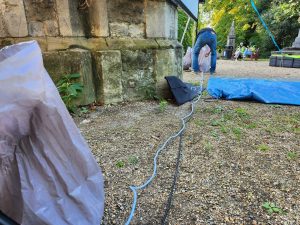
A 10m 4 way extension reel should also be plugged into the RCD cable reel and go to the projection table.
Do not plug any non-FFF equipment into any of the extension reels, this is especially important if any catering vans want to plug into the power – they must source their own power as they can cause the FFF cable reels to overheat and cut out.
It is not necessary to unwind the cable reel completely as the power drain is not continually high (around 400W nominal).
16:9 Fast Fold Screen
The large 16:9 Fast Fold screen must be carefully erected and taken down using the following guidance. Setting up the screen while flat requires a minimum of 3 people and making the screen vertical requires a minimum of 9 people, ideally 11. It will take about an hour to setup with everyone available.
Tarpaulin
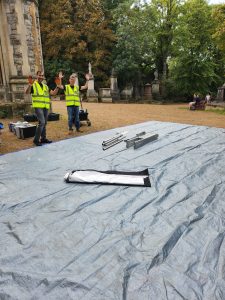
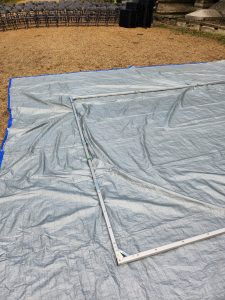
The large tarpaulin should be used for a base to construct and deconstruct the screen on. This is to prevent dirt from entering the hinges and protect the screen. Unfold the tarpaulin fully and place the screen frame and legs onto the tarpaulin.
Frame Setup
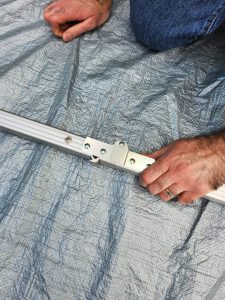
Carefully unfold the screen frame and snap into place.
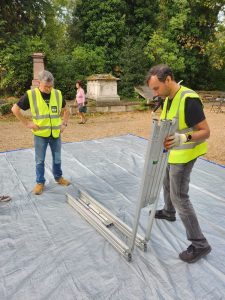
The screen frame should have the “poppers” face up and should be the right way round. There are stickers on the underside to determine the correct orientation. This is important, as the legs need to be in the right place and the screen needs to be the right way up in order for the legs to be aligned. Rotate the screen as necessary to ensure it is the right way up.

Ensure all segments are snapped into place and the four corner arms are locked.
Reinforcement Bars
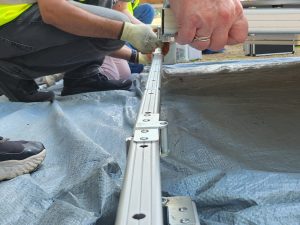
The reinforcement bars should now be attached, each reinforcement bar goes underneath the top and the bottom of the frame to reinforce the middle hinge to stop it from popping open under load.
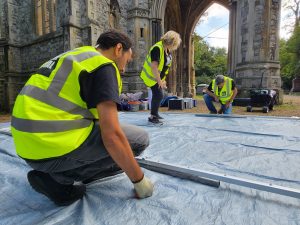
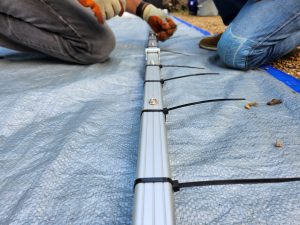
Each reinforcement bar should be attached to the screen with a minimum of eight cable ties in between the poppers to stop them from sliding off. Ensure the cable ties are as tight as possible and space them out evenly. Cut the excess from the cable ties with cutters as close as possible to the locking end.
Legs
The legs should be laid out next. Each leg is colour coded so make sure the blue and red leg goes to the correct side of the screen as well as the blue and green leg. Align the position of the leg by matching coloured tape with the screen tape. Do not deviate from this for an outdoor event!
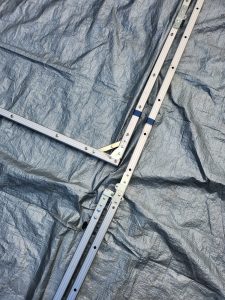
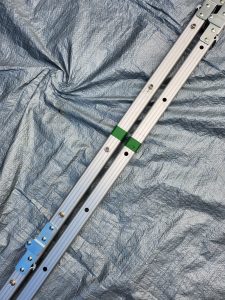
The leg must be the right way up – the leg will have a long section and a short section attached to the bottom of the leg. Ensure the short section is at the front (top while laying down) and the long section on closest to the ground.
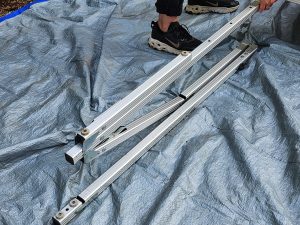
The screen surface should be attached next before bolting the legs onto the frame as it will be easier to put the screen surface on while the legs are not attached.
Screen Surface
The screen surface is now ready to be attached. A minimum of three strong people are required to attach the surface, six is ideal. Unfold the surface carefully ensuring the screening surface is face up.

Ensure the screen surface is the right way up by finding the logo which should be in the bottom left of the screen surface.
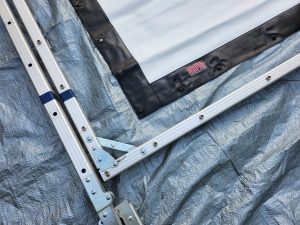
Move the surface to the top corner of the screen frame. Work in teams of three or more. One person should pop the screen on the poppers while the other two pull and stretch the screen surface.

Take care to not scrunch up the screen borders when pulling and keep the screen surface close to the frame. Work along the top edge first. If there are six or more people (two teams) the other team can start from the same corner working down the screen.
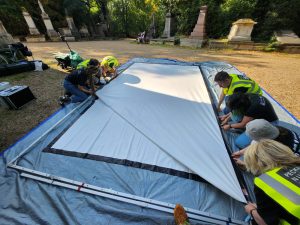
Continue popping the screen on in sequence around the screen. After a horizontal edge has been completed, work on the two sides before moving to the other horizontal edge. Please note that this task will get very difficult very quickly especially in cold weather. It may be necessary to have more people to pull the screen in order for the poppers align.
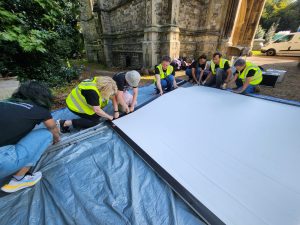
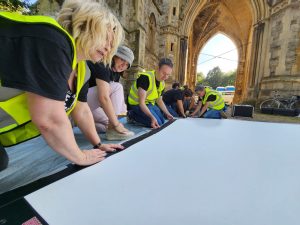
After the screen has been completely attached congratulate each other on a job well done! Cups of tea all round!
Cleaning the Screen
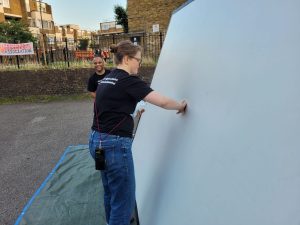
Now check the condition of the screen – it may need cleaning. If the screen is dirty, it’s easier to clean the middle of the screen by raising the screen vertically. Cleaning the edges is easier when the screen is flat. Use wet wipes or other suitable cleaning solutions.
Attach the Legs
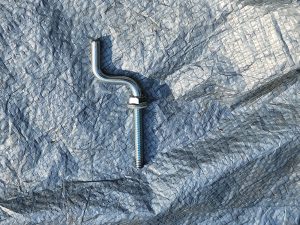
The Legs should now be attached to the frame with the crank bolts starting with the top and the bottom and then the middle but do not tighten the cranks until all the cranks are in place and the rope is attached.
Ropes
Ropes must be used with the screen for outdoor events. The ropes provide stability to the screen as the screen is very vulnerable without ropes and wind may take the screen at any moment until the ropes are secure, so it is an essential safety tool to ensure the health and safety of staff and public.
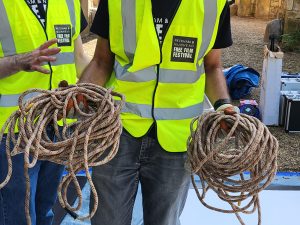
Two ropes are provided, one for each side. Carefully unwind the ropes removing any tangles and knots. Find the midpoint of the rope which has black tape around it as an indicator.
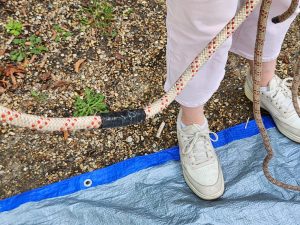
Wrap the black taped section of the rope once or twice around the top of the leg in between the leg and the frame.
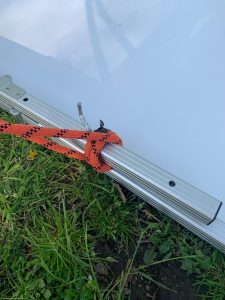
It may be necessary to loosen the crank bolt at the top of the leg to facilitate this. Ensure the rope is wrapped close to and above the crank bolt. Then tighten all crank bolts.
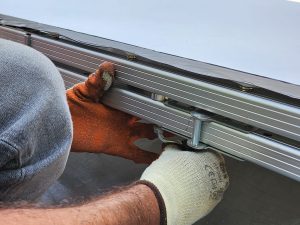
Raising the Screen
This will require a minimum of 9 people, 11 people will be ideal. The screen is at its most vulnerable while raising the screen and it is easy for people to become complacent while waiting for the screen to be secured. Be vigilant at all times as the wind may pickup the screen at any moment as it will act as a sail.
One person must act as coordinator and will need to secure the legs and bang the pegs into the ground once the screen is up. It is the coordinator’s responsibility to ensure the screen is moved into the correct location and that everyone follows what the coordinator says. The coordinator will be responsible for the health and safety of everyone involved so do take charge and explain the process to everyone involved.
First move the screen while it is flat so that the bottom of the legs are on the tarpaulin underneath. Ensure the ropes are clear and untangled. It will take a minimum of 2 people to move the screen in this position.
Divide the team into two groups, one per side.
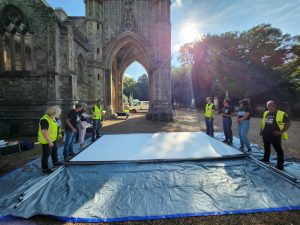
Each person will have a specific role to play. In each group allocate one person per rope, one person to look after the bottom of the legs and ensure the legs stay on the ground, one person to walk the screen upwards and then look after the top of the screen. This is four people per side. If there are more people available, ask them to help with walking the screen upwards and then looking after the middle of the screen. Position the rope people diagonally away from the screen in front and behind the screen to ensure the screen does not fly off and to keep tension in the ropes.
With everyone in place explain the procedure in full and then explain each step again before you do that step.
First, instruct the people looking after the bottom of the legs to keep them on the ground. As the screen is raised, the legs will tend to lift upwards and their job is to make sure the legs stay on the ground.
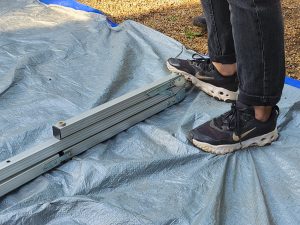
Second, instruct the people walking the screen upwards to begin the lift the screen in unison and slowly raise the screen to the vertical position.

Ask the people on the ropes to take up the slack as the screen gets raised and to move as necessary to remain diagonally in place keeping the tension in the ropes and keeping the screen under control in case there are any gusts of wind.
Once the screen is vertical the screen must be moved into the position.
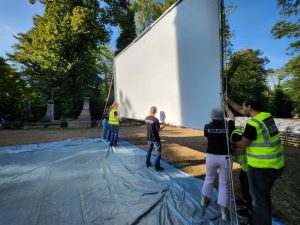
Moving the screen
The coordinator must now instruct everyone to move the screen into the final position in unison. The people looking after the legs must continue to look after the legs, the people who walked the screen upwards should look after the top of the screen and the rope people must keep tension on the ropes and move with the screen.
With the instructions explained the coordinator can tell everyone to begin moving the screen into the final position.
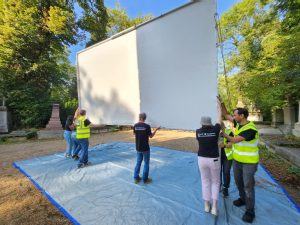
Once the screen is in the final position the coordinator must go to each leg, open the legs out so the short section is at the front and the long section is at the back.
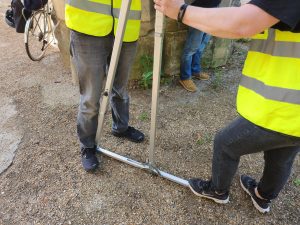
The long section of the leg is in three parts – the bottom part, a long diagonal part which folds back to the middle of the leg and bottom of the screen frame and a very short pivoting section with a hole in it. This very short section must be secured to the middle of the leg in the hole with a crank bolt.
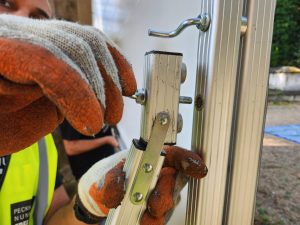
It may not align at first try, it may be necessary to tilt the screen forward to get the holes to align properly in order for the crank to go through. Tighten up the crank and ensure the diagonal stays at the bottom of the legs are locked into position. Then place a sand bag on the leg to help take the strain. Repeat for the other leg.
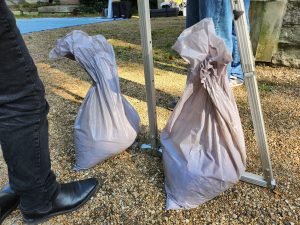
Securing the screen
Once the legs are secured with the crank bolts, move to the rope holders diagonally away from the screen and use the mallet to hit the pegs into the ground. Position the peg so that it is diagonally away from the screen so the peg goes into the ground at an opposing angle to the screen. Make sure the peg is secure and then ask the rope person to tie the rope to the peg by first wrapping it around the peg a couple of times and then tying a knot.
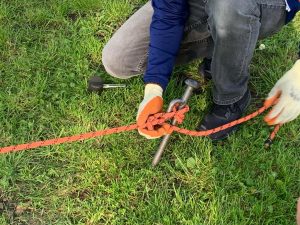
Move on to each diagonal where each rope person should be and repeat the process.
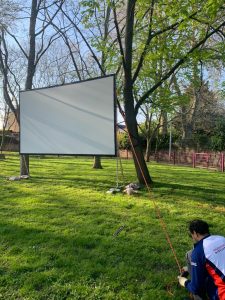
If it is not possible to use pegs, alternatives must be found such as fences, pillars or other heavy objects.
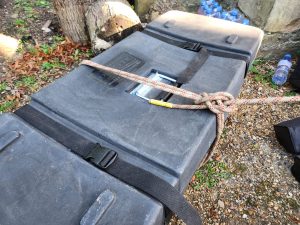
Once all the ropes are tied to the pegs the coordinator should then make sure the screen is square by making sure the legs are straight and not crooked and the frame is not twisted – adjust the ropes, sandbags and legs as necessary.
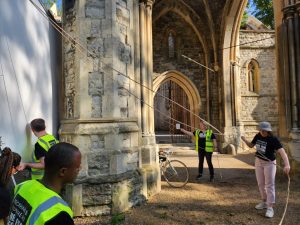
It is important to get this as accurate as possible as it will significantly improve the strength of the setup.

The screen is now setup and everyone should be congratulated for a job well done.
Taking down the screen
Taking down the screen can be difficult, as everyone would have left so you may end up with different people to help. However, the same number of people are required. Ensure the large tarpaulin is in place to allow the screen to be broken down and no dirt get into the hinges.
The coordinator should begin by untying the ropes and asking the rope holder to take the strain. Then remove the sand bags and undo the crank bolts for the rear of the leg. Collapse the triangular stays at the bottom of the leg and fold the leg sections up.
Now move the screen forward with the bottom of the leg people looking after the bottom, the top people looking after the top and the rope people moving with the screen ensuring they are able to take any strain should the wind pickup. Move the screen to the front of the tarpaulin.
Now ask the leg people to ensure the legs remain on the ground and ask the top people to begin to walk the screen down to a vertical position.
Once the screen is horizontal, extra people can go and the screen can now be taken apart.
Begin by removing the screen surface by carefully un-popping the screen from the frame by pulling close to the screen frame taking care to not rip the screen off with too much force or too quickly. This can make the screen rip.
With one person at each end, fold the screen surface in half lengthways with the projection surface on the inside. Make sure the folds are neat and precise. Fold the screen in half again along the length. Then fold the screen in half along the middle by one person moving to the other. Fold the screen in half again. Finally fold the screen lengthways in thirds and then place in the screen bag.
Remove the ropes from the legs and gather the ropes neatly.
Remove the crank bolts from the legs and collapse the legs.
Break the four corners of the screen frame and then break each hinge along the short sides first. You should be able to fold the screen frame along the short sides with the long sides still fully extended.
Once the short sides are folded, you should now be able to break the hinges of the long sides almost simultaneously as the sides will be close together. As each side breaks collapse the frame and bring the sides closer to each other. It might take a bit of squeezing in the right place to unlock the hinges.
Once the screen is fully collapsed place the screen frame into the case, followed by the legs and then the screen bag.
Ensure all the screen crank bolts are present and in the crank case provided before closing the screen case.
Projector Setup
Allow 30 minutes for the projector setup. The projector should be about 7 metres away from the screen. The table or podium should be placed roughly in the centre of the screen. If using tables, ensure the large table is locked in place and the small table is locked in place and on top of the large table.
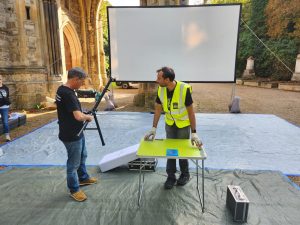
Now place the projector onto the small table with the lens of the projector in line with the middle of the screen.
It is important to get this as accurate as possible as it will speed up the alignment procedure dramatically.
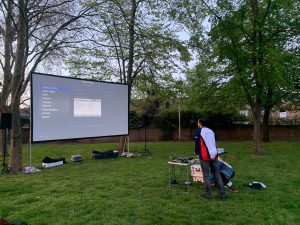
Turn on the projector and adjust the front of the projector until it is at the correct height. It may be necessary to use packing to ensure the projector is secure. Attach the HDMI and power cables to the rear of the projector.
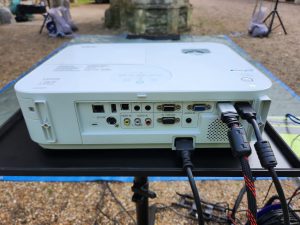
Adjust the zoom so the image is as large as possible and then move the projector forwards or backwards so that the projected image fills the screen. By setting the zoom to the maximum level the projector is as close to the screen as possible and so will give the best brightness. Be prepared to move the tables and cables as they may not be in the best position.
Hold the projector completely in your hands and try and point it so that the image fills the screen square on. You may find that only 3 sides are straight but the 4th side is not. If this is the case, move the screen slowly from left to right or vice versa and understand what side gets bigger or smaller as you move the projector. You will then be able to determine the mid-point where the left and right sides are the same and the top and bottom sides are the same. Keep the projector in this position and place it onto the table. Now pack the front of the projector to make the top and bottom of the projected image fit the screen.
You may find the bottom or top of the image larger than the other. Adjust this by using the “Keystone” button on the projector remote control and adjust the vertical keystone until the image is fully rectangular. Note: using Keystone will reduce image quality so use it as a last resort. If you do use Keystone it will be necessary to adjust the zoom as the image will now be smaller. You can quickly do this by moving the table backwards carefully (as the projector’s zoom wheel will already be at the maximum position). Once the image fills the screen you may need to adjust the keystone again and make fine adjustments to the zoom.
You may also need to adjust the feet at the rear of the projector to correct for the tilt. Experiment by lifting the projector up slightly at the rear corner to see which foot needs to be raised.
You may need to fine-tune all other adjustments incrementally as you get the projected image closer and closer to the edges of the screen.
Digital Mixer
FFF now has two Behringer Flow 8 digital mixers as well as the old Soundcraft analogue mixer. The digital mixers are small, very easy to use and very powerful for the experts among us. The digital mixers have Bluetooth and you can stream from your phone to the mixer if you want to put some music on while setting up. The mixer can also be controlled using an app which allows EQ settings to be made if required.
Plug a microphone into XLR input 1 (or 2) and plug the Bluray player into Jack inputs 7 and 8. If you are using a media player, this should be plugged into Jack inputs 5 and 6.
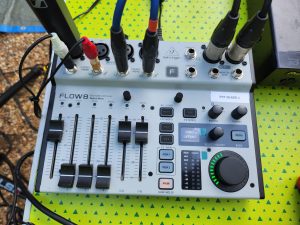
The first slider (fader) controls input 1 – the microphone and the last slider (6) controls inputs 7 and 8, the Bluray player. Slider 5 controls the media player, inputs 5 and 6.
The round control is the main volume control.
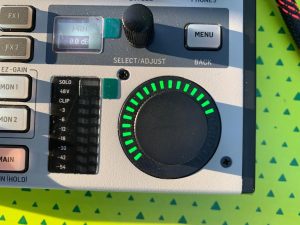
When you turn on the mixer, ensure all the sliders are at the bottom minimum position. There should be no yellow lights on above the sliders – if there are the slider won’t work until the yellow lights go off. To turn off the yellow lights, move the slider to the top and back down again – this should make the slider work again.
When someone wants to speak on the microphone, turn the Bluray and / or media player slider down (slider 6 / 5) and the microphone slider up (slider 1). After the microphone has been used, turn the microphone slider down and put the Bluray or media player slider up again.
The sliders should only be moved up to the “0” position, the main volume should be set accordingly. You may move the slider above the “0” position if necessary however, but “0” should be the best position.
If you want to play Bluetooth music, you need to pair your phone to the mixer. Use the “menu” button to select the Bluetooth menu, and then use the menu knob to find “Pair Phone”. Pressing down on the menu knob will select the option and begin the pairing process. You should see the mixer show up on your phone and you can now pair your phone to the mixer. There is a dedicated round volume knob for the Bluetooth volume which you can adjust if necessary.
If you want to control the mixer with the app on the phone, first install the app. Then select “Pair App” on the mixer and then connect button on the app. The app should connect to the mixer after a few moments and you can then control the mixer with your phone. The range is about 10 meters so you can’t walk far away if you want to control the sound.
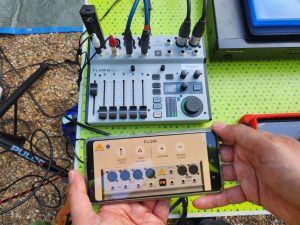
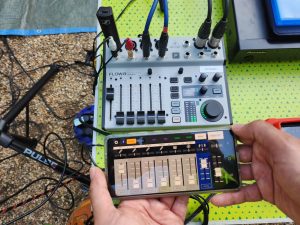
The mixer has a preset built in which can reset the mixer settings to the preset if necessary.
Yamaha Mixer
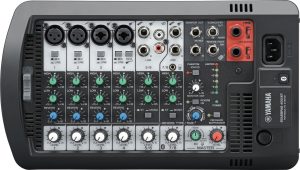
The Yamaha mixer is analogue and is also simple to use. It is a powered mixer which means it only works with it’s own Yamaha speakers that come with it.
Plug the mic into XLR input 1 (or 2) and the Bluray player into inputs 5/6 or 7/8. Plug the media player into inputs 5/6 or 7/8. The Yamaha PA comes with Box C which includes a phono-phono (RCA/RCA) cable which plugs into the white and red phono sockets of inputs 5/6.
For Microphone inputs, make sure the High control is set to the 12 O’Clock position and the Low control is set all the way to the left (-10) – this cuts the boomy bass out and handling noise which is not in the human speech frequency range. For the Bluray player or Media Player set both the High and Low controls to the top 12 O’Clock position.
Now set the white channel controls at the bottom to the triangle marker (1 O’Clock position).
The blue effect knob should be all the way to the left at the minimum position and the green knob should be at the middle “Music” position (12 O’Clock).
The Red control on the right is the master volume control and should be set to the desired level.
Connect the speakers into the Red Left and Right Jack outputs of the mixer on the top right.
Speakers
Speakers should be placed on Speaker Stands. The Speaker stands should be opened out next to each other so the legs are opened to the same splay and the heights of the poles can be matched. Tighten the thumb wheel once the speaker legs have been splayed. The splay should be about 60 degrees to distribute the weight horizontally and vertically.
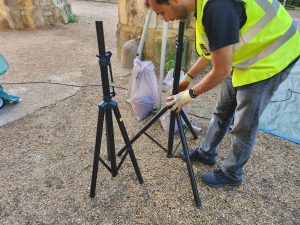
Raise the speaker centre column to the desired height and put the pin in the hole. 2-3 holes should be empty above the pin. The pin is very important as it takes the weight of the speaker, not the thumb wheel. Once the pin is in place, tighten the thumb wheel.
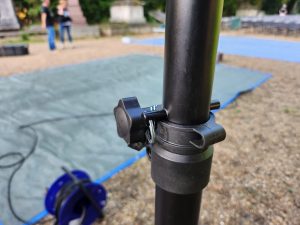
The speaker stand height should be the same and enough so that the speaker is just over the heads of the audience.

Place the speaker stands on either side of the screen with the pole in alignment with the screen.
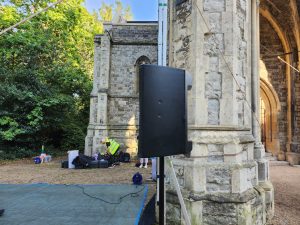
The speakers should be as close to the screen as possible as speech should be perceived to come from the centre of the screen even for viewers who are off to one side.
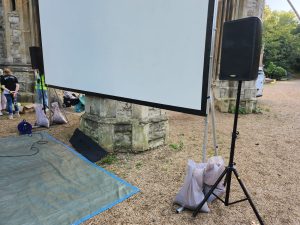
The QSC speakers have two channels – A and B. Connect the XLR cable into the top left connector making sure you have the correct end of the XLR speaker cable – this is the male connector and you should see the pins in the connector. If you see holes, you have the wrong end – this needs to plug into the mixer output.
Then make sure the “A” volume level is set to the 12 O’clock position (for small venues) or 2 or 3 O’clock position (for large or outdoor venues) on both speakers.
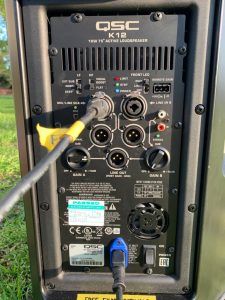
Also make sure the switches are set to:
“Line” (not Mic)
“Normal” (not Subwoofer or extended bass)
“Flat” (not “voice”)
“Peak” (or “power”) so you can see the blue power light at the front of the speakers.
Ensure both speakers have the same settings.
Unravel the speaker cable by rotating the frame in your hand instead of unfeeding the cable out of it. This will reduce the chance of twisting the cable.
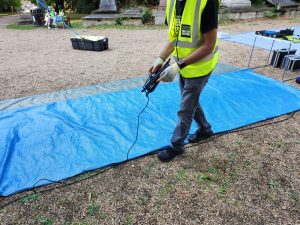
Route the speaker cables and power cables along the centre line of the screen and place a tarpaulin over it or tape the cables down with Gaffer Tape (See below).
Bluray Player
The Bluray player should be connected to the Projector using the HDMI cable and the mixer using the Phono to Jack cable. Make sure you have the red phono plug (right channel) on the back of the player connected to the cable with a red sleeve – the other end of that should be plugged into Jack input 8 on the digital mixer.
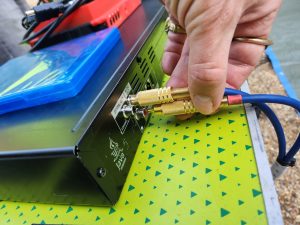
The white phono plug is the left channel and should be plugged into Jack input 7 on the digital mixer with the cable.
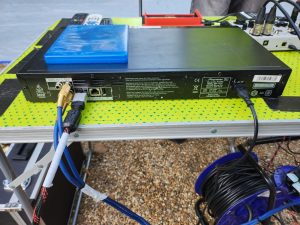
The Bluray player is also able to play some but not all media files on USB. Plug the USB stick into the socket on the front of the player and use the remote control to navigate to the content on the USB stick. Please note that this is a slow process! It is not so quick to change from USB media to a Bluray disk; the quickest way is to turn off the Bluray player, remove the USB stick and then turn on the player – it should play the Bluray disc if one is inserted.
The USB stick should be formatted with FAT, FAT32 or NTFS for large files. Mac formatted USB sticks are not supported.
Media Player
The media player is the preferred device to use if you want to play a video or audio file. Do not use a laptop as it won’t be insured. The Media Player should be able to play all audio and video files though it may struggle with ProRes and it won’t be able to play DCP files – you’ll have to convert these with something like VLC or Davinci Resolve.
The USB stick should be formatted with FAT, FAT32 or NTFS for large files. Mac formatted USB sticks are not supported.
The provided A/V cable jack connector plugs into the back of the media player – make sure you plug this in all the way firmly. The red and white phono connectors are the right and left channels respectively and they should be connected to the digital mixer in Jack socket input 6 for the red (right) channel and 5 for the white (left) channel. Slider 5 controls the media player volume, set this to the “0” position.
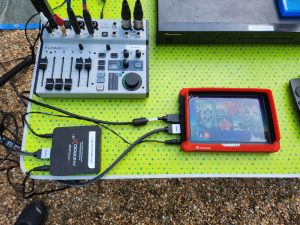
If necessary, we have a Field Monitor that will allow you to see what the media player is doing by plugging the HDMI cable into the Field Monitor input and then plugging an HDMI cable from the output of the Field Monitor into the Projector. Care must be taken to make sure the projector shows the same image as the Field Monitor as sometimes it defaults to a screen resolution the projector does not support.
Plug the USB stick into the media player and select the appropriate menu option if using Media Player 1.
Media Player 2 runs android and you need to use the “Kodi” app to play media files. Simply select this using the remote control (the big blue K in the bottom left hand corner) and then navigate to your files on the USB0 or USB1 menu option. You may need to adjust the audio delay in Kodi to adjust for lip sync issues – a delay of -0.125ms may work well.
Radio Mics
We have two Sennheiser XSW-D digital radio mics available to use now. They are very simple in operation. Each mic box comes with a hand held microphone, a transmitter and a receiver. The transmitter plugs into the bottom of the hand held mic, the receiver plugs into XLR input 1 of the digital mixer. Once both transmitter and receiver are plugged in, turn them both on by pressing and hold the power button of the receiver and transmitter. They should both begin to flash green and go solid green after a few moments. If they do not go solid green after a minute, turn them both off and try again.
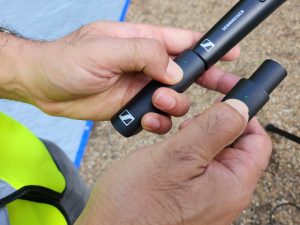
The radio mic transmitter and receiver need to be charged before use with the supplied charging cable and USB adapter. You may use your own adapter and cable if you have a USB C charger. The transmitter and receiver will turn to solid green and then off when fully charged.
The transmitter and receiver have about 3 hours of use, so when the mic is not in use, turn off both the transmitter and receiver by pressing and holding the button until the light goes off.
The range of the radio mic is low so advise whoever is using the mic to stay close.
Taping Cables
Care must be taken to use the correct Tape on the cables. Do not use “Duct” tape directly on a cable. Use “Gaffer” Tape instead. It’s a cloth or polyethylene based tape and leaves little or no residue on the tape after use. It can be ripped by hand.
A suitable Gaffer Tape is from GafferTape.com or Amazon – Magtape Matt Xtra 50mm x 50m. It’s about £10 for 50m.
If you need to stick the tape to concrete, you may need to use Duct Tape to stick a strip to the concrete as the Gaffer Tape may not stick well. If you do this, use two strips side by side with a slight overlap along the cable run. Then place the cable on top of the Duct Tape and then use the Gaffer Tape on top of the cable sticking it to the Duct Tape.
To remove the Gaffer Tape it is important to pull the Gaffer Tape away from the cable and not to pull the cable up. If you pull the cable up the Gaffer Tape will wrap itself around the cable and you will then need scissors to cut the Gaffer Tape off.
Please ensure all cables are clean after use. If you get Duct Tape on the cable you will need to use a solvent to remove the residue off the cable. Please do not return cables with Duct Tape on them!
Returning the Kit to the Lockup
If you have to return the kit to the lockup please make sure you put the equipment back in the appropriate shelves and keep everything tidy. This makes it much easier for the next person to collect and access the equipment.
Conclusion
This guide is a work in progress and will be updated in due course. Please feel free to make any suggestions or changes.
Fahzan Ahmad
Revision History
1.0 24/9/22 – Initial Document
1.1 02/9/23 – Updated with some pictures
1.2 14/9/23 – Updated with more pictures
